

:max_bytes(150000):strip_icc()/GettyImages-585297068-52005387a57248a19e3ee29bc1af44b4.jpg)
WHAT IS DNS?
DNS, or Domain Name System, is a fundamental component of the internet infrastructure that translates human-readable domain names (like www.example.com) into machine-readable IP addresses (like 192.0.2.1). This translation is crucial because while humans prefer to use memorable names, computers and network devices communicate using numerical IP addresses.
1. Google Public DNS
- Primary DNS: 8.8.8.8
- Secondary DNS: 8.8.4.4
- Description: Google Public DNS is known for its high speed, reliability, and security. It also supports DNS over HTTPS (DoH) and DNS over TLS (DoT) for enhanced privacy.
2. Cloudflare DNS
- Primary DNS: 1.1.1.1
- Secondary DNS: 1.0.0.1
- Description: Cloudflare DNS is designed for speed and privacy. It does not log IP addresses and offers DoH and DoT support, making it one of the most privacy-focused DNS services available.
3. OpenDNS
- Primary DNS: 208.67.222.222
- Secondary DNS: 208.67.220.220
- Description: Owned by Cisco, OpenDNS provides customizable filtering options and robust security features against phishing and other threats. It also offers DNS over HTTPS (DoH).
4. Quad9
- Primary DNS: 9.9.9.9
- Secondary DNS: 149.112.112.112
- Description: Quad9 focuses on security and privacy. It blocks access to malicious domains and does not store personal data. Quad9 also supports DoH and DoT.
5. AdGuard DNS
- Primary DNS: 94.140.14.14
- Secondary DNS: 94.140.15.15
- Description: AdGuard DNS blocks ads, trackers, and phishing websites, providing a cleaner and safer browsing experience. It also supports DNS over HTTPS (DoH) and DNS over TLS (DoT) for enhanced privacy.
6. Comodo Secure DNS
- Primary DNS: 8.26.56.26
- Secondary DNS: 8.20.247.20
- Description: Comodo Secure DNS provides additional security by blocking malicious websites and offering phishing protection. It's aimed at users seeking a secure browsing experience.
7. Verisign Public DNS
- Primary DNS: 64.6.64.6
- Secondary DNS: 64.6.65.6
- Description: Verisign Public DNS emphasizes stability, security, and privacy. It does not sell user data to third parties and ensures a reliable DNS experience.
8. CleanBrowsing
- Family Filter DNS: 185.228.168.168
- Adult Filter DNS: 185.228.168.10
- Security Filter DNS: 185.228.168.9
- Description: CleanBrowsing offers multiple DNS options tailored to different needs, such as family-friendly browsing, blocking adult content, and enhanced security. It also supports DoH and DoT.
9. DNS.Watch
- Primary DNS: 84.200.69.80
- Secondary DNS: 84.200.70.40
- Description: DNS.Watch is a free, uncensored DNS provider focused on privacy. It does not log any user data and ensures fast and reliable DNS resolution.
10. Yandex.DNS
- Primary DNS: 77.88.8.8
- Secondary DNS: 77.88.8.1
- Description: Yandex.DNS offers three modes: Basic (fast DNS resolution), Safe (protection against malicious sites), and Family (blocks adult content). It is primarily used in Russia and offers a reliable service.
These DNS servers offer a range of benefits, including enhanced security, privacy, speed, and customization options, catering to different user needs and preferences.
HOW CAN I APPLY DNS?
Well, it's Very Simple to apply DNS into your devices. HERE ARE STEPS;
On a Windows PC
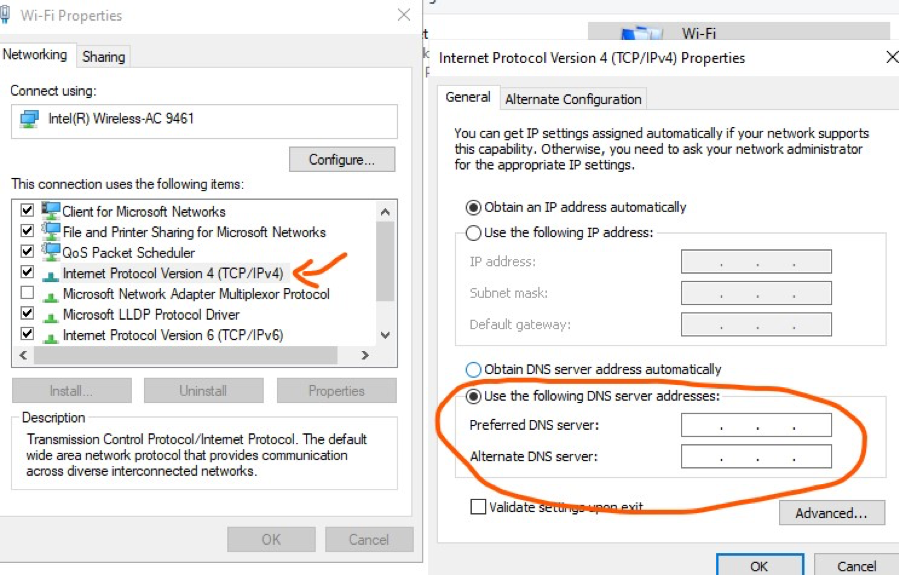
Open Network Connections:
- Press
Win + R, typencpa.cpl, and press Enter.
- Press
Choose Network Adapter:
- Right-click on the network adapter you are using (Wi-Fi or Ethernet) and select
Properties.
- Right-click on the network adapter you are using (Wi-Fi or Ethernet) and select
Select Internet Protocol Version:
- Scroll down and select
Internet Protocol Version 4 (TCP/IPv4)and clickProperties.
- Scroll down and select
Enter DNS Server Addresses:
- In the window that opens, select
Use the following DNS server addresses. - Enter the preferred DNS server (e.g.,
8.8.8.8for Google Public DNS) and the alternate DNS server (e.g.,8.8.4.4).
- In the window that opens, select
Apply Changes:
- Click
OKto save your changes.
- Click
Restart Network Connection:
- You may need to disconnect and reconnect to your network for the changes to take effect.
On a Mac
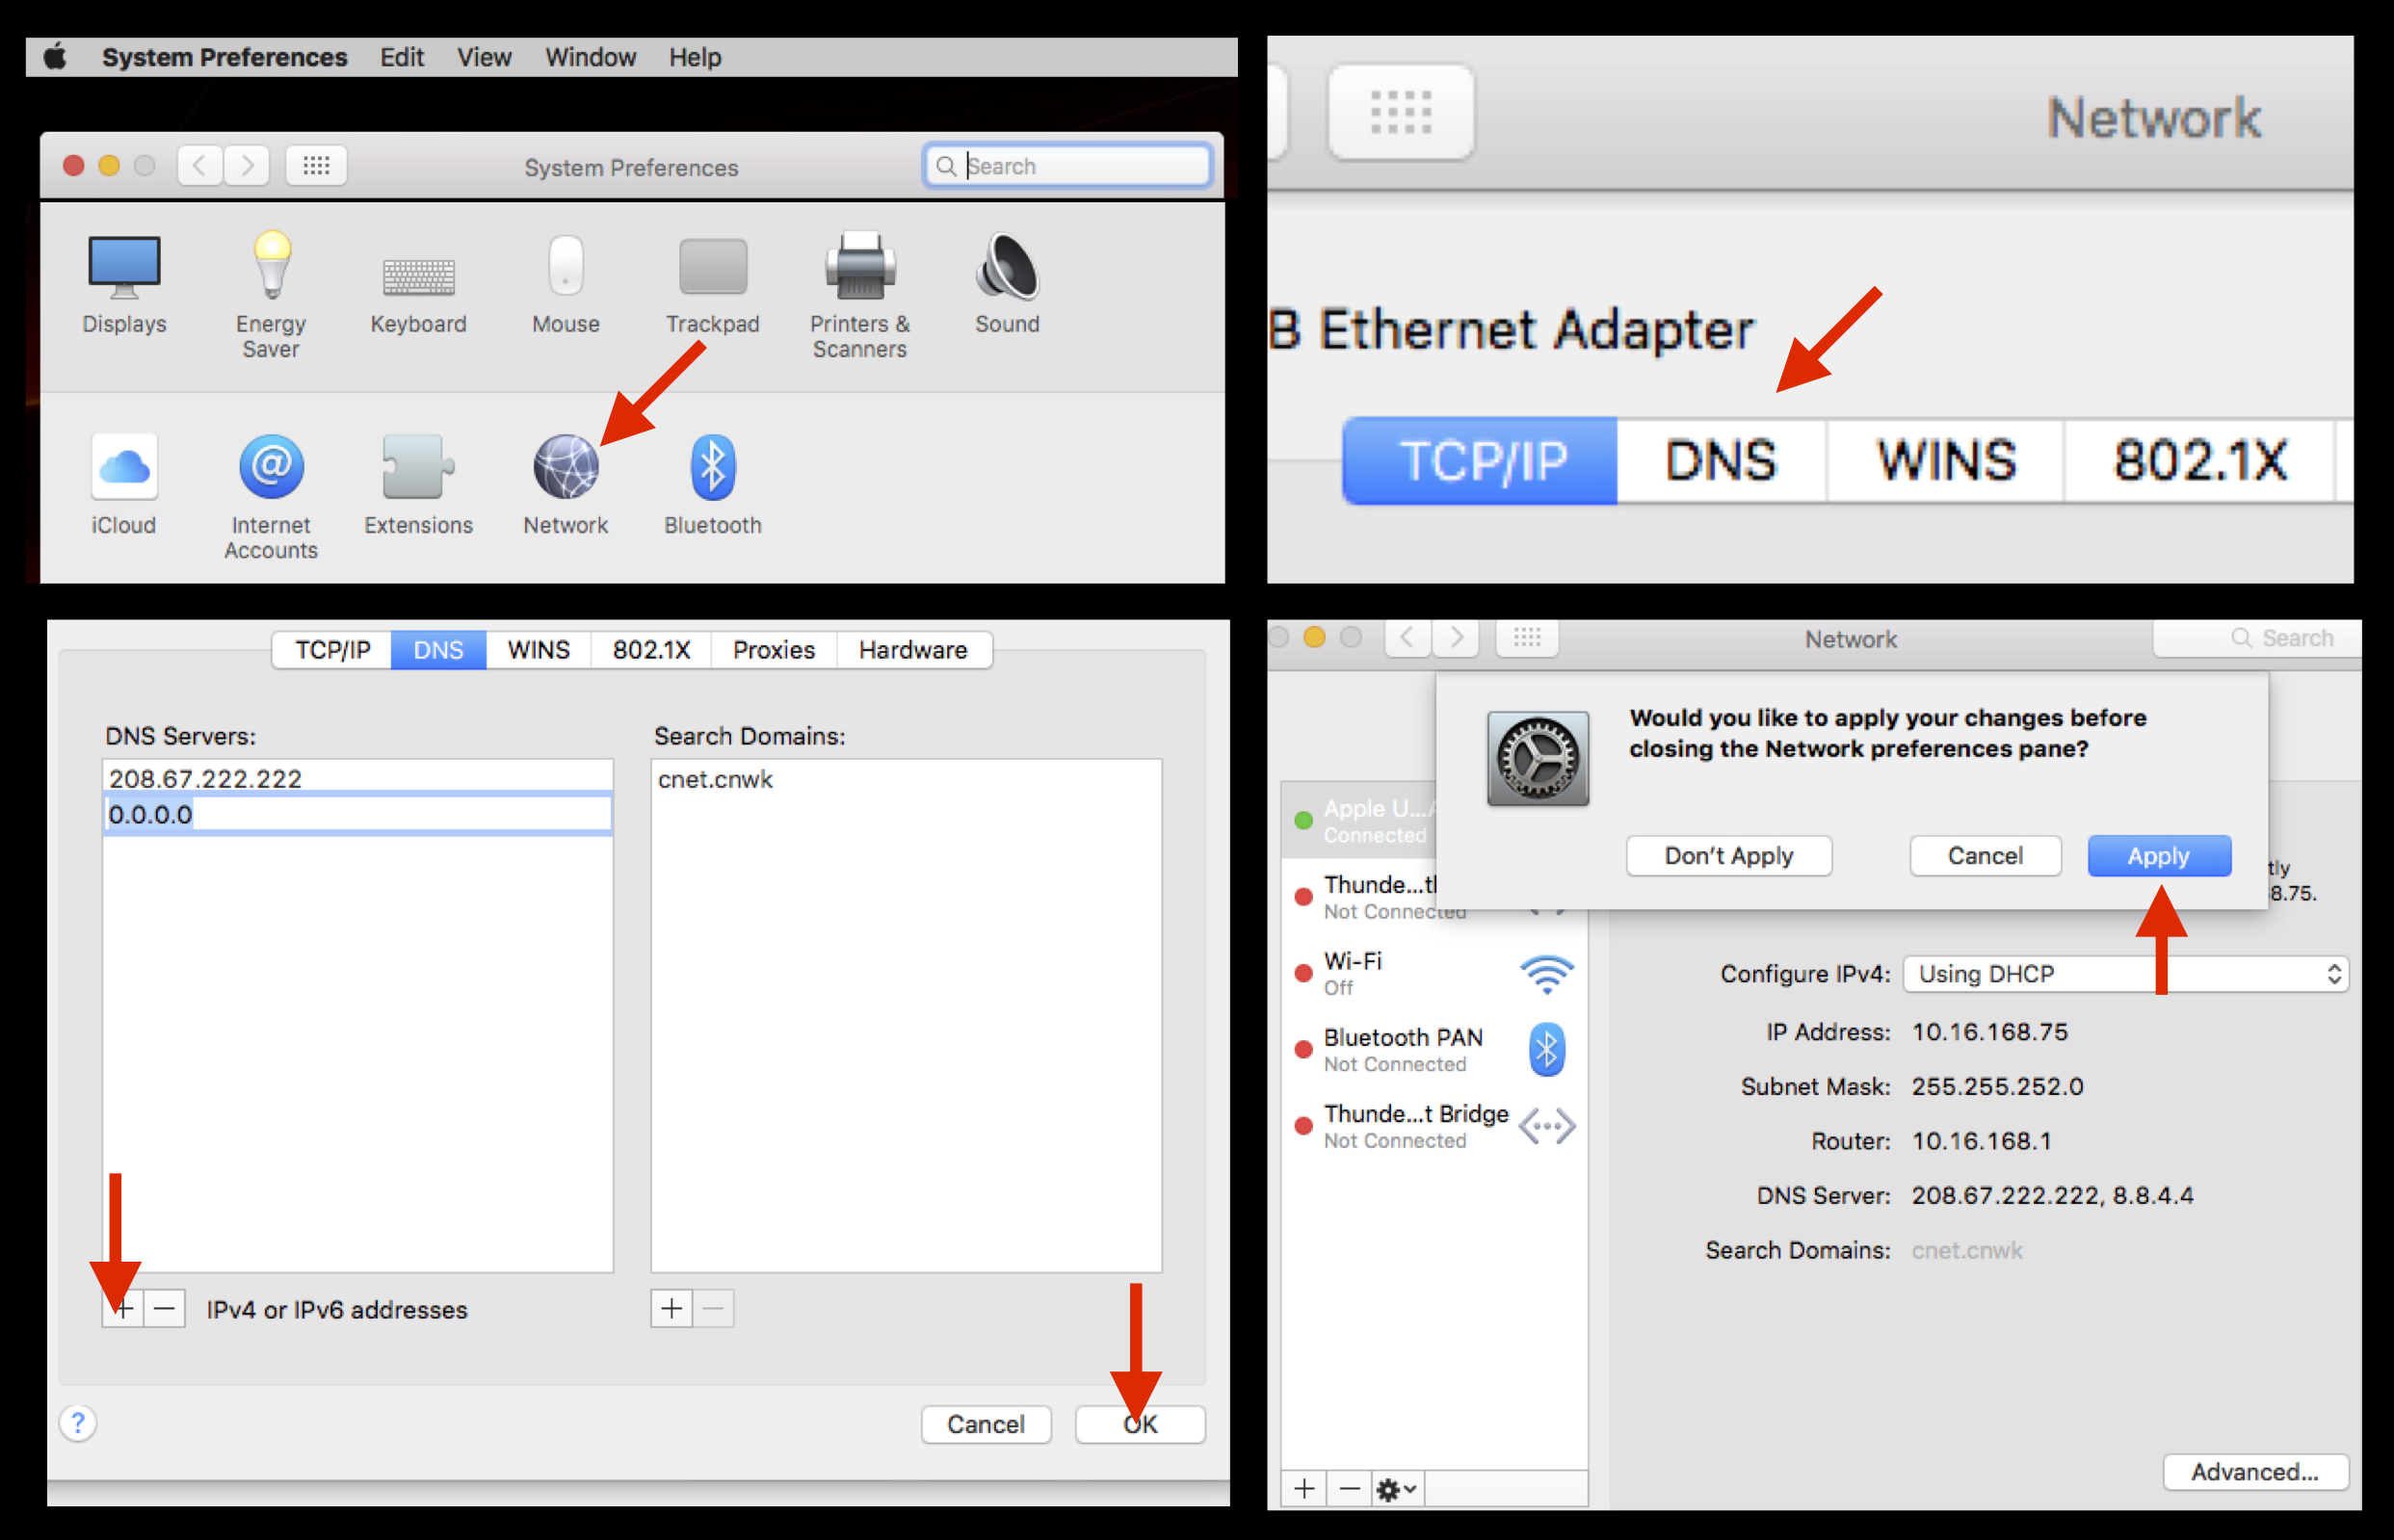
Open Network Preferences:
- Click the Apple logo in the top-left corner and select
System Preferences, then chooseNetwork.
- Click the Apple logo in the top-left corner and select
Choose Network Connection:
- Select your network connection (Wi-Fi or Ethernet) from the list on the left, then click
Advanced.
- Select your network connection (Wi-Fi or Ethernet) from the list on the left, then click
Go to DNS Tab:
- In the window that appears, go to the
DNStab.
- In the window that appears, go to the
Add DNS Server Addresses:
- Click the
+button to add a new DNS server and enter the DNS server addresses (e.g.,1.1.1.1for Cloudflare DNS and1.0.0.1).
- Click the
Apply Changes:
- Click
OK, thenApplyto save your changes.
- Click
On an Android Phone
:max_bytes(150000):strip_icc()/AndroidDNS01-3f2ebd4d869843efb300e15f6e72bea5.jpg)
Open Settings:
- Go to
Settings, then selectNetwork & InternetorConnections.
- Go to
Select Wi-Fi:
- Tap on
Wi-Fi, then select your connected Wi-Fi network.
- Tap on
Modify Network:
- Tap on
Modify networkorAdvanced(this may vary by device).
- Tap on
Show Advanced Options:
- If necessary, check the box for
Show advanced options.
- If necessary, check the box for
Set DNS:
- Change
IP settingstoStatic. - Scroll down to the
DNS 1andDNS 2fields and enter the DNS server addresses (e.g.,9.9.9.9for Quad9 and149.112.112.112).
- Change
Save Changes:
- Tap
Saveto apply the changes.
- Tap
On an iPhone/iPad

Open Settings:
- Go to
Settings, then tap onWi-Fi.
- Go to
Select Wi-Fi Network:
- Tap the
iicon next to your connected Wi-Fi network.
- Tap the
Configure DNS:
- Scroll down and tap on
Configure DNS.
- Scroll down and tap on
Manual Configuration:
- Select
Manual, then tapAdd Server.
- Select
Enter DNS Server Addresses:
- Enter the DNS server addresses (e.g.,
94.140.14.14for AdGuard DNS and94.140.15.15).
- Enter the DNS server addresses (e.g.,
Save Changes:
- Tap
Saveto apply the changes.
THANKS FOR READING!!!
- Tap


0 Comments